
What Is NGINX?
(pronounced “engine X”) is open-source web server software designed to handle a high number of connections simultaneously. These characteristics make it one of the most powerful and scalable server software options on the market.
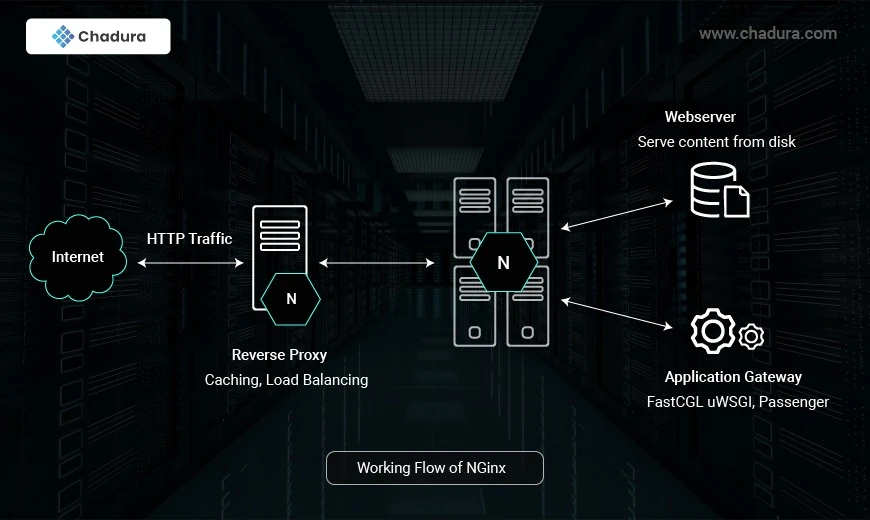
NGINX is often used as a reverse proxy. This means you’ll typically find it stationed behind a private network, where it forwards client requests to the appropriate server.
NGINX is open-source web server software used for reverse proxy, load balancing, and caching. It provides HTTPS server capabilities and is mainly designed for maximum performance and stability. It also functions as a proxy server for email communications protocols, such as IMAP, POP3, and SMTP.
NGINX also acts as a load balancer. This means it distributes requests across multiple servers so that they won’t become overloaded. In turn, this setup leads to faster web speeds for users.
The NGINX Architecture
- Workers accept new requests from a shared listen socket and execute highly efficient run loops inside each worker to process thousands of requests.
- Masters read and validate configurations by creating, binding, and crossing sockets. They also handle starting, terminating, and maintaining the number of configured worker processes. The master node can also reconfigure the worker process with no service interruption.
Proxy caches are special processes. They have a cache loader and manager. The cache loader checks the disk cache item and populates the engine’s in-memory database with the cache metadata. It prepares the NGINX instances to work with the files already stored on the disk in a specifically allocated structure. The cache manager handles cache expiration and invalidation.
Benefits of NGINX
Using NGINX comes with several benefits, including the following:
- Reduces the waiting time to load a website. You don’t have to worry about high latency on your websites, therefore providing a good user experience.
- Speeds up performance by routing traffic to web servers in a way that increases the overall speed. This feature provides a good browsing experience to your users.
- Acts as an inexpensive and robust load balancer.
- Offers scalability and the ability to handle concurrent requests.
- Allows on-the-fly upgrades without downtime.
Common NGINX Issues
Some of the common NGINX issues include the following:
- The NGINX server is consuming too much of your CPU power even though there isn’t much traffic.
- NGINX workers crash because of a lack of memory on your server. This is related to excessive CPU consumption and insufficient memory.
- Upstream timeout errors like “502 Bad Gateway.” This usually happens when one of your servers receives an invalid response from another server. An overloaded server can also cause it. Solving these issues will require the user to clear cache and browser cookies, which can be an unpleasant experience.
Advantages of NGINX
1) High performance: NGINX is renowned for its exceptional speed, ensuring the swift delivery of static content to users. This attribute is critical for enhancing user experience and reducing web page load times.
2) Low resource usage: Leveraging an asynchronous architecture, NGINX efficiently handles a substantial number of connections with minimal memory usage. This frugal resource approach makes it an economical and efficient choice for various hosting scenarios.
3) Scalability: NGINX seamlessly adapts to growing web traffic, making it a preferred choice for websites anticipating expansion. Its ability to handle increasing loads ensures consistent performance even during heightened demand. To ensure smooth operation and optimize your web server setup, you can easily install for efficient traffic management.
4) Load balancing: Functioning as a reliable load balancer, NGINX efficiently distributes incoming requests among multiple servers. This not only prevents overloading but also ensures optimal utilization of resources, contributing to a more stable and responsive web environment.
Disadvantages of NGINX
While NGINX boasts numerous advantages, it's essential to consider potential drawbacks:
1) Complex configuration: Some users find NGINX's configuration more intricate than that of other web servers. Configuring it for specific requirements may pose challenges for those unfamiliar with its setup.
2) Limited native dynamic content handling: While excelling at serving static content, NGINX may require additional configurations for optimal dynamic content handling. This additional setup can be perceived as a disadvantage for users seeking a more straightforward solution.
Installation and Configuration of Nginx Web Server
Install Nginx On Ubuntu/Debian:
Update the package list
sudo apt updateInstall Nginx
sudo apt install nginxStart and Enable Nginx
sudo systemctl start nginxEnable Nginx to start on boot:
sudo systemctl enable nginxCheck Nginx status:
sudo systemctl status nginxBasic Configuration
Nginx configuration files are located in /etc/nginx/. The main configuration file is /etc/nginx/nginx.conf, and site-specific configurations are typically stored in /etc/nginx/sites-available/ and symlinked to /etc/nginx/sites-enabled/
Create a new configuration file in /etc/nginx/sites-available/:
sudo nano /etc/nginx/sites-available/mywebsiteAdd the following configuration:
server {
 listen 80;
    server_name example.com www.example.com;

    root /var/www/mywebsite;

    index index.html;

    location / {

    try_files $uri $uri/ =404;
    }

# Optional: Serve static files directly

    location /static/ {

    alias /var/www/mywebsite/static/;

    }

# Optional: Proxy requests to a backend server

    location /api/ {

        proxy_pass http://localhost:3000/;

        proxy_set_header Host $host;

        proxy_set_header X-Real-IP $remote_addr;

        proxy_set_header X-Forwarded-For $proxy_add_x_forwarded_for;

    }

}
Enable the configuration by creating a symlink in /etc/nginx/sites-enabled/:
sudo ln -s /etc/nginx/sites-available/mywebsite /etc/nginx/sites-enabled/Test the Nginx configuration for syntax errors:
sudo nginx -tReload Nginx to apply the changes:
sudo systemctl reload nginxServe Static Content
Create the directory for your website:
sudo mkdir -p /var/www/mywebsiteCreate a sample index.html file
sudo nano /var/www/mywebsite/index.htmlCreate a sample index.html file:
sudo nano /var/www/mywebsite/index.htmlSet the correct permissions:
sudo chown -R www-data:www-data /var/www/mywebsitesudo chmod -R 755 /var/www/mywebsiteFirewall Configuration
If you have a firewall enabled, allow HTTP (port 80) and HTTPS (port 443) traffic:
On Ubuntu/Debian:
sudo ufw allow 'Nginx Full'Caddy (web server)
What is Caddy?
Caddy is a modern, open-source web server and reverse proxy designed to be simple, secure, and efficient. It is written in the Go programming language and is known for its automatic HTTPS feature, which makes it easy to secure websites with SSL/TLS certificates. Caddy is designed to be user-friendly, with a focus on simplicity, performance, and security.
Caddy Web Server Architecture

1. Core Components
Caddy is built using a modular and extensible architecture, allowing it to support various features dynamically.
- Caddy Core: Manages the lifecycle of the server, including configuration loading, module initialization, and process management.
- Caddyfile Adapter: Converts human-readable configuration (Caddyfile) into a structured JSON format.
- Module System: Caddy uses a pluggable module system where core functionalities (like HTTP handling, TLS, and logging) and additional plugins can be loaded dynamically.
2. HTTP Server (Caddy's Primary Functionality)
Caddy primarily functions as an HTTP server and reverse proxy.
- Request Handling: Uses middleware to process incoming HTTP requests, applying features like authentication, logging, and caching.
- Reverse Proxy: Can route requests to backend servers with automatic load balancing.
- Static File Server: Efficiently serves static content with minimal configuration.
3. Automatic HTTPS with Let's Encrypt
One of Caddy’s key features is its automatic TLS support.
- Certificate Management: Handles SSL/TLS certificates automatically using Let's Encrypt or custom providers.
- On-the-Fly Renewal: Periodically renews certificates before expiration.
- OCSP Stapling: Improves TLS performance by reducing validation overhead.
4. Configuration and API
Caddy supports dynamic configuration via:
- Caddyfile: A simple, human-friendly configuration file.
- JSON API: A RESTful interface for live configuration changes without requiring a restart.
5. Extensibility and Plugins
Caddy is highly extensible due to its modular nature. Key extensions include:
- Custom authentication modules.
- Logging and analytics integrations.
- Advanced proxying features.
6. Performance and Security
Caddy is designed for performance and security:
- Asynchronous Processing: Utilizes Go’s concurrency model for handling multiple requests efficiently.
- Memory Safety: Built with Go, reducing risks of memory corruption.
- Security-First Approach: Enforces best practices like HTTP/2, HSTS, and secure cipher suites.
7. Deployment and Use Cases
Caddy is used in various scenarios, including:
- Static website hosting.
- Reverse proxying for microservices.
- Automatic HTTPS termination for applications.
- Load balancing and failover handling.
Advantages of Caddy
- Automatic HTTPS
- Automatically provisions and renews SSL/TLS certificates using Let's Encrypt.
- Supports OCSP stapling, HSTS, and automatic certificate renewal.
- Easy Configuration
- Simple, human-readable configuration using Caddyfile.
- JSON-based API for live reconfiguration without restarts.
- Built-in Reverse Proxy
- Natively handles load balancing, failover, and WebSocket proxying.
- Supports HTTP/2 and gRPC with no additional setup.
- High Performance
- Asynchronous request handling leveraging Go's concurrency model.
- Optimized for lower resource usage compared to other servers (e.g., Nginx, Apache).
- Modularity and Extensibility
- Plugin system for extending functionality (authentication, logging, caching).
- Supports Go-based custom modules.
- Security by Default
- Secure TLS defaults, automatic HTTPS setup, and sandboxed execution.
- Cross-Platform and Lightweight
- Available on Linux, Windows, macOS, and embedded systems.
- Single binary deployment with minimal dependencies.
- Dynamic Configuration API
- Allows live updates of configurations without restarting the server.
- Useful for large-scale deployments with dynamic requirements.
Disadvantages of Caddy
- Limited Ecosystem Compared to Nginx or Apache
- Smaller community and fewer third-party modules.
- Lacks some advanced features like fine-grained caching and complex rewrites.
- High Memory Usage in Some Cases
- Uses more RAM than Nginx when handling many concurrent connections.
- Not as lightweight for complex applications as Nginx with OpenResty.
- Learning Curve for JSON Configuration
- Caddyfile is simple, but advanced setups require understanding JSON API.
- Debugging JSON configurations can be difficult.
- Compatibility Issues
- Some legacy applications expect Apache/Nginx-style setups.
- May not support all advanced proxying scenarios without additional customization.
- Commercial Licensing for Advanced Features
- Some enterprise features (e.g., advanced telemetry, commercial support) require a paid license.
To configure Caddy Web Server on an Ubuntu server
Step 1: Install Caddy on Ubuntu Server
Update Package List: First, make sure your package list is up to date.
sudo apt updateInstall Dependencies: Install dependencies for downloading and installing Caddy.
sudo apt install -y debian-keyring debian-archive-keyringDownload and Install Caddy: Run the following command to install Caddy using its official installation script.
curl -fsSL https://get.caddyserver.com | bash -s personalThis installs the latest stable version of Caddy.
Verify Installation: Check if Caddy is installed successfully by running:
caddy --versionStep 2: Configure Caddy for Web Server
Create the Caddyfile: By default, Caddy looks for a Caddyfile in /etc/caddy/ for system-wide configurations. You can create a basic Caddyfile in /etc/caddy/Caddyfile or in your current directory for testing.
Create and open the Caddyfile for editing:
sudo nano /etc/caddy/CaddyfileBasic Web Server Configuration: In the Caddyfile, set up a simple web server that serves content from a folder (e.g., /var/www/html):
:80 {

root * /var/www/html

    file_server

}
:80 tells Caddy to listen on HTTP port 80.
- root * /var/www/html sets the root directory where files are served from (you can change this to any directory containing your website files).
- file_server tells Caddy to serve static files in that directory.
Save and Exit: After editing, save the Caddyfile and exit by pressing CTRL + O, then Enter, and CTRL + X to exit.
Step 3: Start and Test Caddy
Start Caddy Server: After configuring the Caddyfile, you can start the Caddy server by running:
sudo caddy runThis will start Caddy in the foreground. You can visit http://<your-server-ip> in your browser to test if the server is working. You should see the contents of /var/www/html being served.
Step 4: Set Up Caddy as a Service (Optional)
To ensure Caddy runs automatically on system boot, set it up as a systemd service:
Enable and Start the Caddy Service: Enable the Caddy service so it starts automatically on boot:
sudo systemctl enable caddysudo systemctl start caddyCheck Service Status: To verify that Caddy is running, you can check its status:
sudo systemctl status caddyStep 5: Enable HTTPS with Automatic SSL (Optional)
Caddy automatically enables HTTPS (via Let's Encrypt) for any site you serve. To enable HTTPS, modify the Caddyfile:
Modify the Caddyfile: Change the configuration in the Caddyfile to use HTTPS:
your-domain.com {

root * /var/www/html

    file_server

}
Replace your-domain.com with your actual domain name.
- Caddy will automatically request an SSL certificate from Let's Encrypt when you first access the site via https://your-domain.com.
Step 6: Restart Caddy: After updating the Caddyfile, restart the Caddy service to apply the changes:
sudo systemctl restart caddyStep 7: Managing Caddy with systemd
To stop, restart, or check the status of Caddy as a service:
sudo systemctl stop caddyRestart Caddy:
sudo systemctl restart caddyCheck the status of Caddy:
sudo systemctl status caddy