AWS Multi-Factor Authentication (MFA) strengthens access security by requiring users to provide two different forms of identification: something they know (their password) and something they possess (an authentication code from their MFA device). Once MFA is configured, logging into the AWS Management Console means you’ll enter your usual username and password, then be prompted for a code generated by your registered device—usually a phone app or physical token. This two-step process makes it much harder for unauthorized users to gain access, even if your password gets compromised. Basically, MFA acts as a vital extra barrier, significantly reducing your AWS account’s exposure to threats.
Setting Up MFA In AWS Account
There are several physical device options to choose from when setting up MFA for your AWS account. These are:
- FIDO Security Keys (Hardware device that provides security codes by third-party companies like Yubico)
- Virtual Authenticator Apps (Virtual Apps like Google/Microsoft Authenticators that can be downloaded for free from Google Play Store)
- Hardware TOTP tokens (Tokens must be purchased from AWS, these are exclusively made for AWS)
The benefits of using Strong DM for AWS authentication include:
- Centralized access control and management. As a unified platform centralizing privileged access management, you can easily control and monitor user permissions.
- Streamlined user provisioning and deprovisioning. Resource owners can effortlessly grant or revoke access, ensuring efficient onboarding and offboarding of users without hassle.
- Secure access. The local client acts as a tunnel, securely forwarding requests from the user's workstation to the gateway through a single TLS 1.2-secured TCP connection.
- Eliminate credential exposure: Access is granted based on user identity and role without the end user ever needing to see or enter credentials to connect to resources.
- Fine-grained access controls and role-based permissions. Administrators can define and manage user privileges at a detailed level, ensuring the right individuals have the appropriate access.
- Auditing and monitoring capabilities. Audit trails help you track and analyze every activity and query, providing comprehensive visibility into user activities and improving investigation and response times for security incidents.
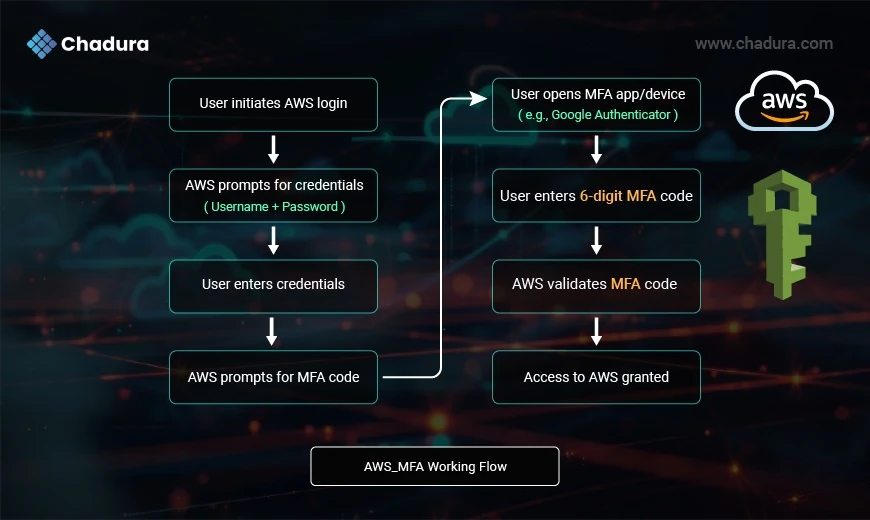
How AWS MFA Works
Multi-Factor Authentication (MFA) is a security system that requires users to present two or more forms of verification before granting access:
- Something you know – like your password.
Something you have – like a mobile device or hardware token.
When enabled in AWS, MFA requires users to enter a 6-digit code generated by an MFA device after logging in with their username and password.
Step-by-Step guide on how to set up MFA access in AWS IAM:
Step 1: Log in to the AWS Management Console
Access the AWS Management Console using your administrator or root user credentials.
Step 2: Navigate to IAM
In the AWS Management Console, navigate to the IAM dashboard. You can usually find IAM under the “Security, Identity, & Compliance” section.
Step 3: Select the User for MFA
Choose the IAM user for whom you want to enable MFA. This user should have their own set of permissions.
Step 4: Access the “Security Credentials” Tab
Once you’ve selected the user, navigate to the “Security credentials” tab.
Step 5: Activate MFA
In the “Sign-in credentials” section, click the “Manage” button next to “Assigned MFA device.”
Step 6: Choose MFA Device
You’ll be prompted to set up an MFA device for the user. You can choose either “Virtual MFA device” or “Hardware MFA device.” A virtual MFA device usually involves using an authenticator app (like Google Authenticator) on your smartphone, while a hardware MFA device is a physical token.
Step 7: Follow the Setup Wizard
Follow the setup wizard for the selected MFA device type. For a virtual MFA device, you’ll typically need to scan a QR code using the authenticator app and enter the generated code. For a hardware MFA device, you’ll need to follow the device-specific setup instructions.
Step 8: Verify MFA
After setting up the MFA device, you’ll be prompted to enter the current MFA code to verify that it’s working correctly.
Step 9: Save and Enable MFA
If the verification is successful, save the MFA setup, and MFA will be enabled for the IAM user.
Step 10: Adjust User Policy (Optional)
You can also attach an IAM policy to the user that mandates the use of MFA. This policy can deny access to any AWS service or resource unless MFA is used.
Step 11: Test MFA
Finally, log out of the AWS Management Console, and log back in as the IAM user. You’ll be prompted to enter your MFA code during the sign-in process.
Conclusion
AWS Multi-Factor Authentication (MFA) is a critical security feature that significantly enhances the protection of AWS accounts and resources. By requiring a second form of verification—typically a time-based one-time code from a virtual or hardware device—MFA ensures that even if a password is compromised, unauthorized access is still prevented. The working process is simple yet powerful, involving user credential verification followed by a secure MFA token check before granting access. Implementing MFA not only strengthens security but also aligns with best practices and compliance standards. In today’s threat landscape, enabling MFA on all AWS user accounts—especially root and privileged IAM users—is not just recommended; it’s essential for maintaining the integrity and confidentiality of your cloud environment.